
이번에는 내 포트폴리오 사이트의 접근성을 개선해보고자 한다.
접근성 지수가 높아야 봇이 웹 사이트의 정보를 잘 가져갈 수 있어서 SEO에 유리할 수 있다.
접근성에 유리한 요소는 접근 가능한 라벨, 색 대비, 시멘틱 태그 등이 있다.
1. 버튼에 접근 가능한 이름 붙이기
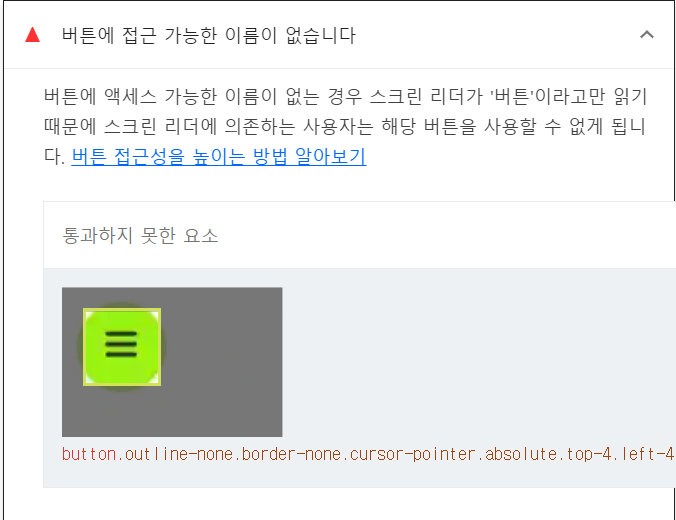
사이드바를 여는 버튼에 네이밍이 없다는 결과를 받았다.
이 부분을 개선해보자
<button
  className={cn(
    'outline-none',
    'border-none',
    'cursor-pointer',
    'absolute',
    'top-4',
    'left-4',
    'w-12',
    'h-12',
    'rounded-full',
    'bg-transparent',
    'flex',
    'justify-center',
    'items-center'
  )}
  onClick={setToggle}>
  <svg width="23" height="23" viewBox="0 0 23 23">
    <Path
      variants={{
        closed: { d: 'M 2 2.5 L 20 2.5' },
        open: { d: 'M 3 16.5 L 17 2.5' }
      }}
    />
    <Path
      d="M 2 9.423 L 20 9.423"
      variants={{
       closed: { opacity: 1 },
        open: { opacity: 0 }
      }}
      transition={{ duration: 0.1 }}
    />
    <Path
      variants={{
        closed: { d: 'M 2 16.346 L 20 16.346' },
        open: { d: 'M 3 2.5 L 17 16.346' }
      }}
    />
  </svg>
</button>
버튼에 접근성에 대한 정보가 없으니 추가해주자.
<button
  aria-label="사이드바 열기"
  role="button"
  className={cn(
    'outline-none',
    'border-none',
    'cursor-pointer',
    'absolute',
    'top-4',
    'left-4',
    'w-12',
    'h-12',
    'rounded-full',
    'bg-transparent',
    'flex',
    'justify-center',
    'items-center'
  )}
  onClick={setToggle}>
  <svg width="23" height="23" viewBox="0 0 23 23">
    <Path
      variants={{
        closed: { d: 'M 2 2.5 L 20 2.5' },
        open: { d: 'M 3 16.5 L 17 2.5' }
      }}
    />
    <Path
      d="M 2 9.423 L 20 9.423"
      variants={{
       closed: { opacity: 1 },
        open: { opacity: 0 }
      }}
      transition={{ duration: 0.1 }}
    />
    <Path
      variants={{
        closed: { d: 'M 2 16.346 L 20 16.346' },
        open: { d: 'M 3 2.5 L 17 16.346' }
      }}
    />
  </svg>
</button>
2. 시멘틱 태그 개선하기
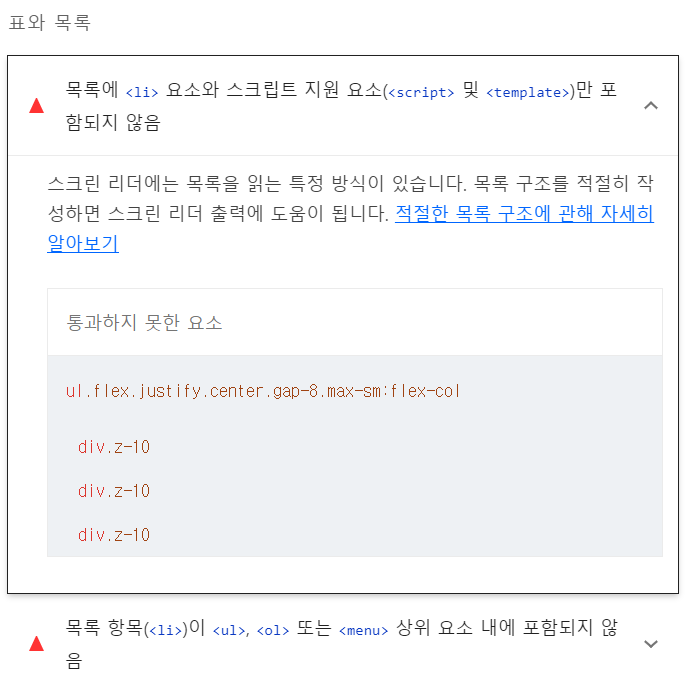
마크업 과정 중에 li 요소를 빠트린 것 같다. 확인해보자.
<ul className="flex justify center gap-8 max-sm:flex-col">
  {blogData.map(({ link, imgSrc, title }, index) => (
    <MotionSlide className="z-10" key={link} delay={(index + 1) * 0.5}>
      <li
        className={cn(
          '2xl:w-96',
          '2xl:h-60',
          'z-10',
          'xl:w-80',
          'xl:h-[12.5rem]',
          'lg:w-72',
          'lg:h-[11.25rem]',
          'w-52',
          'h-[8.125rem]'
        )}>
        <Link
          className="block w-full h-full rounded-lg overflow-hidden"
          href={link}
          target="_blank">
            <Image
              width={0}
              height={0}
            sizes="100vw"
            style={{
              width: '100%',
              aspectRatio: '8 / 5',
              overflow: 'hidden'
            }}
            loading="lazy"
            src={imgSrc}
            alt={title}
          />
        </Link>
      </li>
    </MotionSlide>
  ))}
</ul>
위 부분이 문제가 되는 코드인데 Framer motion을 Wrapping 하는 MotionSlide 컴포넌트가 내부적으로 motion.div로 div 태그를 렌더링하고 있어서 생긴 이슈로 보인다.
MotionSlide 컴포넌트를 보자
'use client';
import { motion, useInView, useAnimation } from 'framer-motion';
import { useRef, useEffect, ElementType } from 'react';

type Props = {
  children: React.ReactNode;
  className?: string;
  delay?: number;
  translateDirection?: 'x' | 'y';
};

const MotionSlide = ({
  children,
  delay,
  className,
  translateDirection = 'x'
}: Props) => {
  const ref = useRef(null);
  const isInview = useInView(ref, { once: true });
  const controls = useAnimation();
  const directionHidden =
    translateDirection === 'x' ? { translateX: 90 } : { translateY: 90 };
  const directionVisible =
    translateDirection === 'x' ? { translateX: 0 } : { translateY: 0 };
  useEffect(() => {
    if (isInview) {
      controls.start('visible');
    }
  }, [isInview, controls]);

  return (
    <motion.div
      ref={ref}
      variants={{
        hidden: { opacity: 0, ...directionHidden },
        visible: { opacity: 1, ...directionVisible }
      }}
      transition={{
        type: 'spring',
        duration: 0.2,
        damping: 8,
        delay: delay,
        stiffness: 100
      }}
      initial="hidden"
      animate={controls}
      className={className}>
      {children}
    </motion.div>
  );
};

export default MotionSlide;
내부적으로 div 태그를 렌더링 하고 있다.
태그를 props로 전달받아 시멘틱하게 렌더링할 수 있도록 바꿔보자.
'use client';
import { motion, useInView, useAnimation } from 'framer-motion';
import { useRef, useEffect, ElementType } from 'react';

type Props = {
  children: React.ReactNode;
  className?: string;
  delay?: number;
  translateDirection?: 'x' | 'y';
  as?: ElementType;
};

const MotionSlide = ({
  children,
  delay,
  className,
  translateDirection = 'x',
  as: Component = 'div'
}: Props) => {
  const ref = useRef(null);
  const isInview = useInView(ref, { once: true });
  const controls = useAnimation();
  const directionHidden =
    translateDirection === 'x' ? { translateX: 90 } : { translateY: 90 };
  const directionVisible =
    translateDirection === 'x' ? { translateX: 0 } : { translateY: 0 };
  useEffect(() => {
    if (isInview) {
      controls.start('visible');
    }
  }, [isInview, controls]);

  const MotionComponent = motion[
    Component as keyof typeof motion
  ] as ElementType;

  return (
    <MotionComponent
      ref={ref}
      variants={{
        hidden: { opacity: 0, ...directionHidden },
        visible: { opacity: 1, ...directionVisible }
      }}
      transition={{
        type: 'spring',
        duration: 0.2,
        damping: 8,
        delay: delay,
        stiffness: 100
      }}
      initial="hidden"
      animate={controls}
      className={className}>
      {children}
    </MotionComponent>
  );
};

export default MotionSlide;
<ul className="flex justify center gap-8 max-sm:flex-col">
{blogData.map(({ link, imgSrc, title }, index) => (
<MotionSlide
as="li"
className={cn(
'2xl:w-96',
'2xl:h-60',
'z-10',
'xl:w-80',
'xl:h-[12.5rem]',
'lg:w-72',
'lg:h-[11.25rem]',
'w-52',
'h-[8.125rem]'
)}
key={link}
delay={(index + 1) * 0.5}>
<Link
className="block w-full h-full rounded-lg overflow-hidden"
href={link}
target="_blank">
<Image
width={0}
height={0}
sizes="100vw"
style={{
width: '100%',
aspectRatio: '8 / 5',
overflow: 'hidden'
}}
loading="lazy"
src={imgSrc}
alt={title}
/>
</Link>
</MotionSlide>
))}
</ul>이렇게 변경하면 태그를 원하는 대로 변경할 수 있다!
이렇게 전부 변경하고 결과 값을 보면...!!
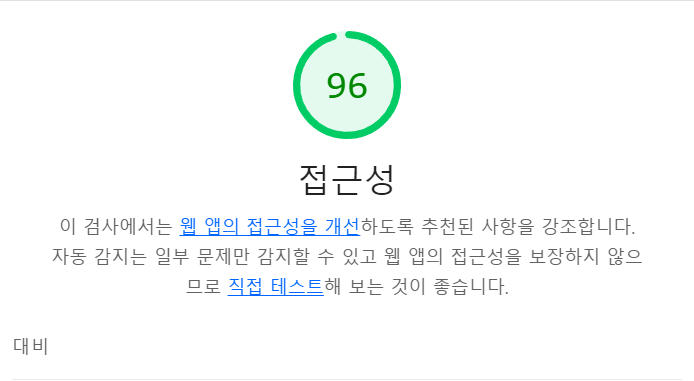
79점 -> 96점으로 상승한 것을 볼 수 있다.
더 공부해서 100점까지 목표로 해보고자 한다.
'Next.js' 카테고리의 다른 글
| Next.js AWS EC2에 배포하기(1) (2) | 2024.11.09 |
|---|---|
| 내 사이트 성능 개선하기 (0) | 2024.07.19 |
| Next.js와 Tailwind CSS를 이용해 로컬 폰트 설정하기 (0) | 2024.03.02 |
| [Next.js 13] Hydration failed because the initial UI does not match what was rendered on the server. (0) | 2023.09.21 |
| Hydration 이해하기 (0) | 2023.09.17 |


